POI - Mapserver Train - Mapserver Label
| Other languagues |
Welcome to the POI - Mapserver Train - Mapserver Label page! Thanks to this tutorial, you will know everything about these mysterious blocks ;)
Differences between POI - Mapserver Train - Mapserver Label
- A POI
 is a block that will allow you to add a small icon on the server map. These blocks have 5 different colors: Blue, green, orange, purple and red.

- A Mapserver Train
 is a block that will allow you to map a railway line. You can note a track line or a station with it.

- A Mapserver Label
 is a block that will allow you to map a road name.

Crafting
POI
To craft a POI, you're gonna have to:
- A Gold block
- 2 papers
- Glass
- And a dye from the above colour range
Then put these blocks in the following arrangement -> 
Mapserver Train
To craft a Mapserver Train, you're gonna have to:
- A Gold block
- 2 papers
- Glass
- And a Wrought Iron Ingot
Then put these blocks in the following arrangement -> 
Mapserver Label
To craft a Mapserver Label, you're gonna have to:
- A Gold block
- 3 papers
- And Glass
Then put these blocks in the following arrangement -> 
Use
POI
To use the POI, place it where you want to use it.
Then press it, and you'll see this interface -> 
- In the "name" box, write a name for your Point of Interest (ex: Player123's House)
- In the "icon" box, write the name of your icon (you can find the list of server icons on this site)
- In the "URL" box, copy and paste the link of a website (for example, a page from the Pandorabox wiki). This box is not mandatory.
It's going to give us this:


Now you have your POI! :D
Mapserver Train
To use the Mapserver Train, place it in your station.
Then press it, and you'll see this interface -> 
- In the "line" box, enter the name of your railway line (ex: Pandorabox Express).
- In the "station" box, enter the name of your station (if this block will be within a station. Otherwise, if it's on the line, don't put anything)
- In the "index" box, enter a number. The number will be used to define the route. Look at this diagram, it will be clearer for you ->
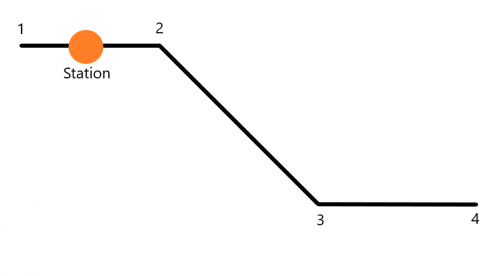

(Even if it's not written on my diagram, put a number in "Index" on your Station block)
- In the "color" box, write the color you want. (ex: red)
It's going to give us this:


Now you have your Trainline! :D
Mapserver Label
To use the Mapserver Label, place it in the middle of your road.
Then press it, and you'll see this interface -> 
- In the "Text" box, write the name of your road (ex: Main street).
- In the "Size" box, enter a number as the text size.
- In the "Color" box, enter an RGB color (you can find your color in RGB on this site).
It's going to give us this:


Hmmm... That's all well and good, but my text isn't big enough, and it's not parallel to my road!
- Change your number in the "Size" box.
- Rotate your text in the "Direction" box. 90 = "Main" at the top, "street" at the bottom; 180 = text upside down; 270 = "Main" down, "street" up; 360 = normal text (0).
It's going to give us this:


There you go! It's all over! The POI - Mapserver Train - Mapserver Label blocks have no more secrets for you :D
- - -
This page has been translated from French to English with DeepL. If you see any mistakes, you will be able to modify them ;)
Writer:  Le_roi_1_111 ( <- name in-game ) - Fraleroy